How do you create a detailed location description?
A professional location description with the right photos and notes prevents 89% of all rental disputes and saves thousands of dollars in legal costs. Belgian courts only accept documents that comply with specific legal standards. This guide guides you step-by-step through creating a watertight location, with digital tools that simplify evidence collection.
What you'll learn in this article
- The legal minimum requirements for a valid location description
- Professional photo techniques for legal proof
- Effective note-taking systems that prevent discussions
- Digital tools that make the process 5 times faster
The legal basis
What should be included in your document at least?
Mandatory elements under Belgian law
- Identification and context
- Full address including floor and bus number
- Names and national register numbers of all parties
- Date and time of formatting (accurate to the hour)
- Reference to the main lease agreement
- Signatures from all attendees
- Systematic room layout
- Logical order (from entrance to rear room)
- Each room separately documented
- Common parts listed separately
- Outdoor areas included
- Technical installations
- Heating system and thermostat
- Electrical installation with fuse box
- Sanitary facilities and pipes
- Ventilation systems and hoods
Regional disparities in 2025
- Flanders: emphasis on energy performance and insulation
- Wallonia: mandatory mention of certificates of conformity
- Brussels: focus on fire safety and emergency exits
The art of legally strong photography
Basic principles for evidence-based photos
The 5 golden rules
- Overview for detail
First overview photo, then close-ups with a reference point - Natural light is king
Shoot between 10 a.m. and 3 p.m. during the day, flash for dark corners only - Systematic approach
Clockwise, at least 4 corners per room - Technical settings
Resolution ≥ 2048x1536, date stamp on, RAW + JPEG in case of damage - Context is crucial
Use a yard/coin, shoot at 1.60 m eye level
What do you absolutely need to photograph?
Standard per room
- All four walls
- Ceiling
- Floor
- Windows & frames
- Doors open and close
- Sockets and switches
- Heaters
Specific points of attention
Kitchen
- Devices + nameplate
- Oven/fridge interior
- Countertops & extractor
- Under sink
Bathroom
- Silicone joints
- Shower enclosures
- Sanitary email
- Cranes (possibly video)
- Ventilation grille
Technical rooms
- Meter readings
- Central heating boiler
- Fuse box
- Water softener
- Ventilation filters
Digital photo organization tools
Automatic features
- GPS tagging
- Timestamps
- Automatic naming
- Cloud backup
- OCR for meter readings
Practical tip: use a tablet instead of a smartphone for better annotation and visibility.
Effective notes: the backbone of your document
Use the correct terminology
Use legally binding terms:
- Avoid: “Wall doesn't look good”
- Use: “15 cm vertical crack, 2 mm wide, 1.20 m high from the north wall”
Standard descriptive terms
For damage:
- Scratch, groove, crack, break
For state:
- New, very good, good, fair, bad
For colors:
- RAL codes if possible
- Indication of discoloration
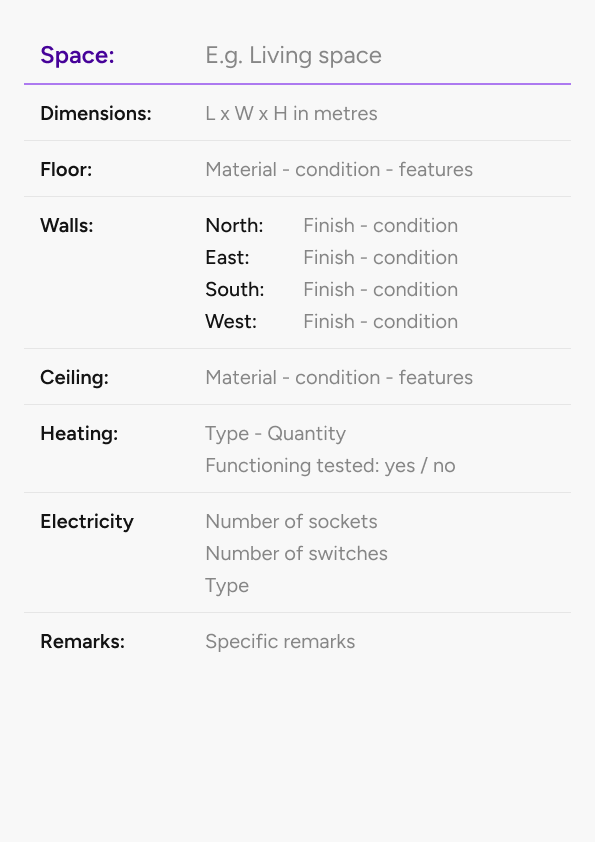
Professional notes structure
Template by room:
Digital note-taking systems
Voice-to-text benefits:
- 3x faster
- Hands-free
- Automatic transcription
- Spell checker
Best practices:
- Speak clearly
- Check transcription right away
- Use templates
Room-by-space approach
Complete checklist
Entrance hall and corridors
- Indoor/outdoor front door
- Lock effect
- Doorbell/intercom
- Postbox
- Floor transition profiles
- Number of keys
Often forgotten: bottom of the front door, videophone, name plate
Living and dining area
- Test sockets
- Sliding windows & shutters
- Parquet: scratches per zone
- Wallpaper/painting
- Behind furniture & window sills
Kitchen
- Numbered cabinets
- Hinges/latches
- Worksheets: cutting tracks/joints
- Devices: brand, operation, damage
- Sink & faucet
Bathroom and toilet
- Silicones, tiles, sanitary ware
- Mirrors, ventilation
- Water tests: shower, toilet, taps
- Leak detection
Bedrooms
- Built-in closets
- obfuscation
- Carpeting
- Walls (holes, stripes)
- Doors
Extra for children's rooms: stickers, safety windows
Technical rooms
Garage/storeroom:
- Gate, electricity, crane
- Ventilation, floor
Attic/basement:
- Accessibility
- Isolation
- Moisture problems
- Accessibility of utilities
Common mistakes and how to avoid them
Mistake 1: Too little detail
Solution: 15-20 points per room
Mistake 2: Poor photo quality
Solution: check on site, rephotograph
Mistake 3: Inconsistent terminology
Solution: use default list
Mistake 4: Forgotten elements
Solution: work with checklists
Mistake 5: Time pressure
Solution: 2-3 hours per inspection
FAQ: Frequently asked questions
How many photos are needed?
No legal minimum. Directive:
- Apartment: 50—80 photos
- House: 100—150 photos
Can I use videos?
Yes, as a supplement. Photos remain mandatory. Use video for tests and panoramas.
What if the tenant does not agree?
Record disagreement verbatim in the document. State both views.
Do I have to use professional equipment?
A smartphone or tablet is sufficient with good lighting and resolution.
How long do I need to keep photos?
10 years after the end of the lease. Save the original format digitally.
Can I add things afterwards?
Within 1 month: addendum possible if signed by both parties.
Conclusion
Invest time for years of security
A thorough description of the place takes an average of 3 hours, but prevents years of discussions. Digital tools reduce time to 90 minutes and increase quality.
Treat every site description as an investment in conflict prevention: what you carefully register today will save you from legal headaches tomorrow.

